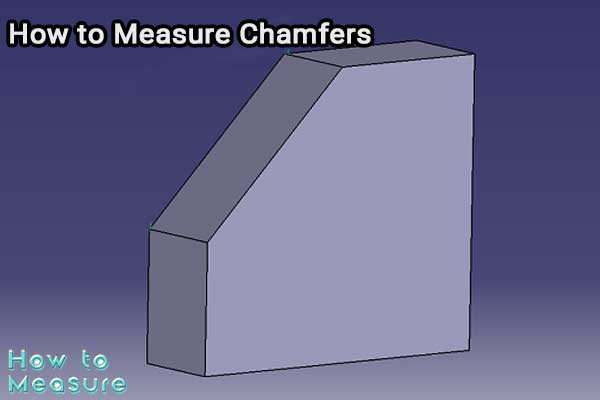
Introduction: Measuring chamfers is a fundamental aspect of engineering and manufacturing processes. Chamfers, or bevels, are sloping edges or surfaces typically added to objects to enhance their aesthetics, functionality, or safety. These angled features are commonly found in various applications, such as machine parts, furniture, and architectural designs. Accurate measurement of chamfers is crucial to ensure precise manufacturing, assembly, and proper fit of components.
This guide on How to Measure will explore different techniques and tools used to measure chamfers effectively. We will discuss traditional and modern methods that provide reliable and precise measurements, helping you achieve desired project outcomes. Whether you are a professional engineer, a machinist, or an enthusiastic DIYer, understanding how to measure chamfers accurately will contribute to your overall success in various manufacturing and construction endeavors.
Throughout this guide, we will cover the key aspects of chamfer measurement, including the terminology associated with chamfers, common types of chamfers, and the tools required for measurement. We will investigate step-by-step procedures for measuring chamfers using calipers, height gauges, micrometers, and optical comparators. Additionally, we will explore advanced measurement techniques, including coordinate measuring machines (CMMs) and 3D scanning, which offer precise and automated solutions for complex chamfer measurements.
Furthermore, we will address potential challenges during chamfer measurements, such as irregular chamfer shapes, varying surface finishes, or limited access to certain areas. We will provide practical tips and strategies to overcome these challenges and obtain accurate measurements even in difficult scenarios.
By the end of this guide, you will have a comprehensive understanding of how to measure chamfers effectively, ensuring your chamfered components meet the required specifications. Whether inspecting chamfers for quality control purposes, designing parts with precise chamfer dimensions, or simply seeking to enhance your machining skills, this guide will equip you with the necessary knowledge and techniques to accomplish your goals. So let’s dive in and explore the world of chamfer measurement!
How to measure chamfer angles
To measure chamfer angles accurately, you can follow these steps:
- Identify the chamfer: Locate the chamfered edge or surface on the object you wish to measure. Ensure the chamfer is clean and free from debris or imperfections that could affect the measurement.
- Select a measuring tool: Choose an appropriate tool based on the size and shape of the chamfer. Common tools for measuring chamfer angles include protractors, bevel protractors, digital angle finders, or a combination square with an angle attachment.
- Align the measuring tool: Position it against the chamfered edge or surface, ensuring it rests flush and securely. Align the reference surface or zero point of the tool with the starting point of the chamfer.
- Read the angle measurement: Use the markings or digital display on the measuring tool to read the angle. Ensure that you accurately align the tool and read the measurement from the correct scale or display.
- Take multiple measurements: To enhance accuracy, take multiple measurements from different points along the chamfer. This will help account for slight variations and provide a more representative average angle.
- Calculate the average: If you have taken multiple measurements, calculate the average of the angles obtained. Add all the measurements together and divide by the total number of measurements to obtain the average chamfer angle.
- Record the measurement: Document the chamfer angle and any relevant specifications or tolerances. This information can be crucial for quality control, assembly, or design.
It’s important to note that chamfer angles can be measured in degrees or other angular units depending on your specific requirements. Ensure that you are using the appropriate unit of measurement and that you adhere to any industry standards or guidelines for chamfer angle measurements.
By following these steps and using the appropriate measuring tools, you can accurately measure the angle of a chamfer and ensure the chamfered component meets the desired specifications.
How to measure chamfer edge?
To measure a chamfered edge, you can follow these steps:
- Determine the type of measurement: Before measuring the chamfered edge, determine what specific dimension or characteristic you want to measure. It could be the length, width, angle, or other relevant parameter.
- Select a measuring tool: Choose one that suits the dimension you want to measure. Some commonly used tools for measuring chamfered edges include calipers, micrometers, height gauges, or rulers.
- Position the object: Place the object with the chamfered edge on a flat surface or in a suitable position for measurement. Ensure that the chamfered edge is accessible and visible for accurate measurement.
- Measure the length: If you want to measure the length of the chamfered edge, use a ruler or measuring tape. Align the starting point of the measurement tool with the beginning of the chamfered edge and read the measurement at the endpoint of the chamfer.
- Measure the width: To measure the width of the chamfered edge, use a caliper or micrometer. Open the measuring jaws and position them on either side of the chamfer, ensuring they are perpendicular to the edge. Close the jaws until they firmly grip the chamfer and read the measurement on the scale or digital display.
- Measure the angle: If you want to measure the angle of the chamfered edge, utilize an angle measuring tool such as a protractor or digital angle finder. Align the base of the measuring tool with the reference surface and position the measuring arm along the chamfered edge. Read the angle measurement indicated by the tool’s markings or digital display.
- Repeat and average measurements: For more accurate results, repeat the measurements at multiple points along the chamfered edge. Take several measurements and calculate their average to account for any slight variations.
- Record the measurements: Document the measured dimensions or angles, noting any relevant specifications or tolerances. Proper documentation is crucial for quality control, manufacturing, or design purposes.
Remember to use the appropriate units of measurement, such as inches or millimeters, based on your specific requirements and industry standards. Additionally, ensure that you are using measuring tools with reasonable accuracy and precision for the desired level of measurement.
By following these steps and using the appropriate measuring tools, you can accurately measure the dimensions or angles of a chamfered edge, allowing you to verify its compliance with the desired specifications.

How to measure chamfer dimensions?
To measure the dimensions of a chamfer accurately, you can follow these steps:
- Select a measuring tool: Choose one suitable for the dimensions you want to measure. Commonly used tools for measuring chamfer dimensions include calipers, micrometers, height gauges, or specialized chamfer gauges.
- Identify the chamfer: Locate the chamfered area on the object you wish to measure. Ensure the chamfer is clean and free from debris or imperfections that could affect the measurement.
- Measure the width: If you want to measure the width of the chamfer, use a caliper or micrometer. Position the measuring jaws or anvils on either side of the chamfer, ensuring they are perpendicular to the edge. Close the jaws or anvils until they firmly grip the chamfer, and read the measurement on the scale or digital display.
- Measure the height: To measure the height of the chamfer, use a height gauge or a specialized chamfer gauge. Position the gauge’s reference surface or base against the flat surface adjacent to the chamfer. Slide the gauge’s probe or blade along the chamfered edge until it touches the highest point of the chamfer. Read the measurement indicated by the gauge’s scale or digital display.
- Measure the length: If you want to measure the length of the chamfer, use a ruler, measuring tape, or a caliper with depth measurement capabilities. Align the starting point of the measurement tool with the beginning of the chamfered edge and read the measurement at the endpoint of the chamfer.
- Verify other dimensions: Depending on the specific design of the chamfer, there may be additional dimensions to measure, such as the angle or the distance between different parts of the chamfer. Use the appropriate measuring tools and techniques to obtain these measurements.
- Repeat and average measurements: For greater accuracy, repeat the measurements at multiple points along the chamfer. Take several measurements and calculate their average to account for any slight variations.
- Record the measurements: Document the measured dimensions, noting any relevant specifications or tolerances. Proper documentation is essential for quality control, manufacturing, or design purposes.
Remember to use the appropriate units of measurement, such as inches or millimeters, based on your specific requirements and industry standards. Additionally, ensure that you are using measuring tools with reasonable accuracy and precision for the desired level of measurement.
By following these steps and using the appropriate measuring tools, you can accurately measure the dimensions of a chamfer, ensuring compliance with the desired specifications.
Chamfer measurement techniques
Several techniques are available for measuring chamfers, ranging from traditional manual methods to more advanced and automated approaches. Here are some commonly used chamfer measurement techniques:
- Manual Measurement Tools:
- Calipers: Use calipers with depth measurement capability to measure the width and depth of chamfers.
- Micrometers: Utilize micrometers with depth rods or blade attachments to measure chamfer dimensions.
- Height Gauges: Use height gauges with probe attachments to measure the height and width of chamfers.
- Optical Comparators: Optical comparators, also known as profile projectors, project magnified images of chamfers onto a screen, allowing for visual inspection and measurement using reticles or graticules. This technique measures chamfers’ profiles, angles, and dimensions.
- Coordinate Measuring Machines (CMMs): CMMs are advanced measurement systems that use touch probes or laser scanners to capture the 3D coordinates of chamfers. These machines provide precise measurements of chamfer dimensions, angles, and profiles and can generate detailed reports.
- 3D Scanning: 3D scanning technologies, such as laser scanners or structured light scanners, capture the complete geometry of chamfers and convert them into digital 3D models. These scans enable accurate measurement of chamfer dimensions, angles, and profiles and the ability to compare the scanned data to CAD models.
- Digital Measurement Tools: Digital calipers, height gauges, or angle finders with digital displays provide precise and easy-to-read measurements of chamfer dimensions, allowing for quick and accurate inspections.
- Chamfer Gauges: Specialized chamfer gauges, designed specifically for measuring chamfers, provide a quick and simple way to verify chamfer dimensions. These gauges typically consist of multiple steps or slots corresponding to standard chamfer sizes, allowing for a quick compliance check.
- Surface Profilers: Surface profilers, such as profilometers or roughness testers, can be used to measure chamfers’ surface finish and texture. This information is valuable for quality control and ensuring proper functionality of chamfered components.
The choice of measurement technique depends on factors such as the complexity of the chamfer, desired accuracy, available equipment, and the specific requirements of your application. Consider the capabilities and limitations of each technique and select the most suitable method for your chamfer measurement needs.
Measuring chamfers on complex surfaces
Measuring chamfers on complex surfaces can pose challenges due to the irregular shape and limited accessibility of the chamfered area. However, with careful planning and the right tools, it is still possible to obtain accurate measurements. Here are some strategies for measuring chamfers on complex surfaces:
- Visual Inspection: Start by visually inspecting the chamfered area to understand its shape, orientation, and any potential obstacles that may hinder measurement. This step helps in determining the best approach for measuring the chamfer.
- Sectioning Method: Consider using a sectioning method if the complex surface allows it. This involves creating a reference plane or section by cutting or masking a portion of the complex surface, exposing the chamfered area for easier measurement using traditional tools like calipers or micrometers.
- Probe Extensions: In cases where the chamfer is located in a recessed or hard-to-reach area, probe extensions can be employed with measurement tools like calipers or depth gauges. These extensions allow reaching deep into narrow spaces to access the chamfered edge and measure its dimensions.
- Non-Contact Measurement Techniques: Non-contact techniques such as optical profilometry or laser scanning can effectively measure chamfers on complex surfaces. These methods use light-based technologies to capture the 3D profile of the chamfer without physically touching it, allowing for the measurement of complex shapes and hard-to-reach areas.
- Coordinate Measuring Machines (CMMs): CMMs equipped with articulated or flexible probes can precisely navigate complex surfaces and measure chamfers. By programming the CMM to follow the contour of the complex surface, it can reach the chamfered area and obtain accurate measurements.
- 3D Scanning: 3D scanning technologies like laser or structured light scanners are valuable for measuring chamfers on complex surfaces. By capturing the complete 3D geometry of the surface, including the chamfer, these scanners provide accurate measurements and enable visualization and analysis of the chamfered area.
- Virtual Measurement and CAD Analysis: In some cases, virtual measurement and analysis can be performed using CAD models. By importing the CAD model of the complex surface into specialized software, measurements can be taken virtually, allowing for accurate assessment of chamfer dimensions and angles.
It’s important to select the appropriate measurement technique based on the complexity of the surface, desired accuracy, and available tools. Consider the specific requirements of your application and consult with experts if necessary to ensure the most suitable method for measuring chamfers on complex surfaces.
Chamfer measurement standards with tables
Unfortunately, I cannot provide specific chamfer measurement standards in tables as my training data only go up until September 2021, and I need access to real-time standards databases. However, I can provide general information about chamfer measurement standards and the parameters commonly considered in such standards.
Chamfer measurement standards can vary depending on the industry, application, and specific requirements. These standards often specify acceptable tolerances, measurement methods, and documentation guidelines for chamfers. Some standards organizations that may provide relevant information include the International Organization for Standardization (ISO), the American National Standards Institute (ANSI), and various industry-specific standards bodies.
When referring to chamfer dimensions, the following parameters are typically considered:
- Chamfer Width refers to the distance between the two chamfered surfaces at a specific point along the chamfer.
- Chamfer Height: The vertical distance from the object’s edge to the chamfered surface at a specific point along the chamfer.
- Chamfer Length: The linear distance along the object’s edge from the starting point to the endpoint of the chamfer.
- Chamfer Angle: The angle formed between the chamfered surface and a reference surface, often specified in degrees.
The specific tolerances and measurement methods for these parameters may be defined in the applicable standards.
To access detailed chamfer measurement standards and corresponding tables, it is recommended to consult the appropriate standards organizations or relevant industry-specific documents. These standards can provide comprehensive guidelines for chamfer measurement, including specific tolerances, inspection methods, and documentation requirements.
Consulting the relevant standards or collaborating with experts in your industry can help ensure that you follow the most up-to-date and accurate chamfer measurement practices and standards.
Using digital measurement tools for chamfer measurement
Using digital measurement tools for chamfer measurement offers numerous advantages, including increased accuracy, ease of use, and the ability to obtain precise digital readings. Here are some steps to follow when using digital measurement tools for chamfer measurement:
- Select the appropriate digital measurement tool: Depending on the specific chamfer dimensions you need to measure, choose a digital caliper, digital height gauge, or digital depth gauge. Ensure the tool has the necessary features, such as depth measurement capability, to measure chamfers accurately.
- Set up the tool: Turn on the digital measurement tool and ensure it is properly calibrated. Follow the manufacturer’s instructions for any specific setup requirements.
- Position the chamfer for measurement: Place the object with the chamfered edge on a stable surface or in a suitable position for measurement. Ensure that the chamfered edge is easily accessible for the digital measurement tool.
- Position the tool: Position the digital measurement tool’s jaws or probes on either side of the chamfer, ensuring they are perpendicular to the edge. Gently close the jaws or bring the probes into contact with the chamfered surfaces, not applying excessive pressure that could distort the measurements.
- Take the measurement: Read the measurement displayed on the digital screen of the measurement tool. Digital measurement tools provide clear and precise readings, often with decimal places, allowing for accurate chamfer measurements.
- Repeat and average measurements: For increased accuracy, repeat the measurement at multiple points along the chamfered edge. Take several measurements and calculate their average to account for any slight variations.
- Record the measurements: Document the chamfer dimensions, noting any relevant specifications or tolerances. Proper documentation is essential for quality control, manufacturing, or design purposes.
Digital measurement tools often have additional features such as data storage, transfer capabilities, and switching between different measurement units. Familiarize yourself with these features to maximize the benefits of using digital tools for chamfer measurement.
Always refer to the manufacturer’s instructions and guidelines for the specific digital measurement tool you are using to ensure accurate and reliable measurements.
Conclusion
In conclusion, measuring a chamfer accurately is essential for ensuring precise dimensions, angles, and profiles of chamfered edges. You can obtain reliable measurements by following the appropriate steps and using the right measuring tools.
The process begins by selecting the suitable measuring tool based on the dimension you want to measure, such as calipers, micrometers, height gauges, or specialized chamfer gauges. Positioning the object and aligning the measuring tool properly is crucial for accurate measurements.
Depending on the specific requirements, you can measure the chamfer’s length, width, height, and angle. Taking multiple measurements and averaging them enhances precision. Recording the measurements and noting any relevant specifications or tolerances for documentation is important.
For complex surfaces, additional techniques such as sectioning, probe extensions, non-contact measurement, or 3D scanning may be employed to measure chamfers accurately.
Following industry standards, consulting relevant organizations, and collaborating with experts can further ensure adherence to specific chamfer measurement guidelines.
Ultimately, accurate chamfer measurements contribute to quality control, manufacturing processes, and adherence to design specifications, leading to precise and functional chamfered edges in various applications.