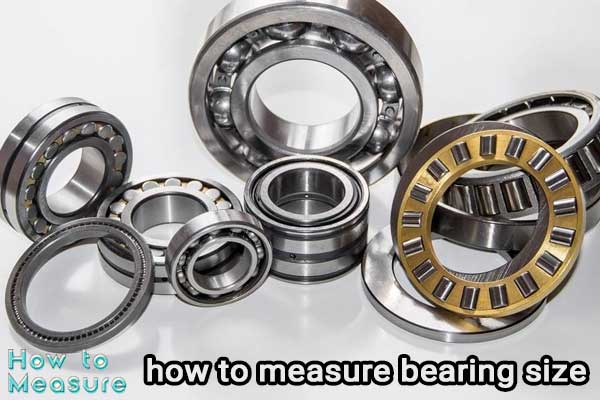
Bearings are crucial in various mechanical systems, providing smooth rotational motion and reducing friction between moving parts. Whether replacing a worn-out bearing or sourcing the right size for a new application, accurately measuring the bearing size is essential to ensure optimal performance and longevity.
However, determining the correct bearing size can be daunting for professionals and enthusiasts alike. The diversity of bearing types, configurations, and sizing standards can present challenges if you need to familiarize yourself with the process. That’s why we have crafted this comprehensive guide to help you accurately navigate the intricacies of measuring bearing size.
In this article on How to Measure, we will demystify the process of measuring bearing size, providing step-by-step instructions and highlighting essential tools and techniques. Whether you’re working with ball bearings, roller bearings, or any other type, we aim to equip you with the knowledge and confidence to identify the right bearing size for your specific application.
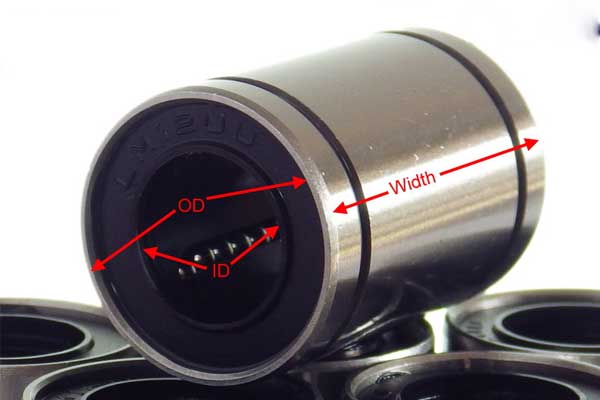
We will delve into the various aspects of bearing dimensions, including inner and outer diameters, width, and bore diameter, and explain their significance in the measurement context. You will discover the importance of understanding bearing tolerance classes and their impact on selection.
Furthermore, we will explore the key measuring tools used in the industry, such as calipers, micrometers, and gauges, and provide practical tips on their proper usage. We will also discuss the significance of precision and accuracy when measuring the bearing size and share techniques to minimize errors.
To cater to a diverse audience, we will cover different measurement methods suitable for various bearings, including deep groove ball bearings, tapered roller bearings, cylindrical roller bearings, and more. Our guide will take you through the unique considerations for each type, ensuring you can confidently measure the size of any bearing you encounter.
Understanding how to measure bearing size accurately is crucial for replacements and selecting the right bearing for a new application. By following the guidelines outlined in this article, you will gain the expertise to make informed decisions, prevent costly errors, and optimize the performance and reliability of your mechanical systems.
So, whether you’re an engineer, maintenance technician, or a DIY enthusiast seeking to master the art of measuring bearing size, join us on this knowledge-packed journey and unlock the secrets to confidently and accurately determining the dimensions of any bearing.
How to measure the bearing inner diameter?
Measuring the inner diameter of a bearing is a crucial step in determining its size and compatibility for a specific application. Accurate measurement ensures the bearing fits correctly and functions optimally within the intended mechanical system. In this section, we will guide you through measuring the inner diameter of a bearing with precision.
Before you begin, ensure you have the necessary tools at hand. A micrometer, dial calipers, or inside diameter (ID) gauge can measure the inner diameter. Here’s a step-by-step guide:
- Clean the Bearing: Clean the bearing’s inner race to remove any debris or lubricants that could affect your measurements. Use a lint-free cloth or a mild solvent to ensure a clear surface for accurate readings.
- Choose a Measurement Tool: Select the appropriate measuring tool based on your preference and the precision required. A micrometer is a common choice for accurate measurements, offering high precision. Dial calipers or an inside diameter gauge can also be used effectively.
- Prepare the Measuring Tool: If using a micrometer, set it to the appropriate range by adjusting the thimble and locknut. For dial calipers, ensure the jaws are clean and well-aligned. If using an inside diameter gauge, ensure it is properly calibrated.
- Position the Bearing: Hold the bearing firmly and position it on a flat surface. Ensure the bearing is stable and does not wobble during the measurement process.
- Take the Measurement: Insert the measuring tool into the inner race of the bearing. Ensure the tool is perpendicular to the axis of the bearing for accurate results. Gently close the jaws of the caliper or micrometer until they make contact with the inner surface of the race. If using an inside diameter gauge, adjust it until it fits snugly inside the race.
- Record the Reading: Once the measuring tool is in place, read and record the measurement indicated on the scale or digital display. Take care to note the units of measurement (e.g., millimeters or inches) for accurate reference.
- Repeat for Accuracy: To ensure accuracy, repeat the measurement at different points along the inner diameter of the bearing. Take multiple readings and calculate the average to account for minor irregularities or variations in the bearing’s internal dimensions.
- Check Tolerance: Compare the measured inner diameter with the bearing’s specification or reference standards to determine if it falls within the acceptable tolerance range. Tolerance information can usually be found in bearing catalogs or manufacturer specifications.
By following these steps, you can accurately measure the inner diameter of a bearing. Handle the bearing carefully and use the appropriate measuring tool for accurate and reliable results. Taking precise measurements will aid in selecting the right bearing size and ensuring optimal performance and longevity in your mechanical systems.
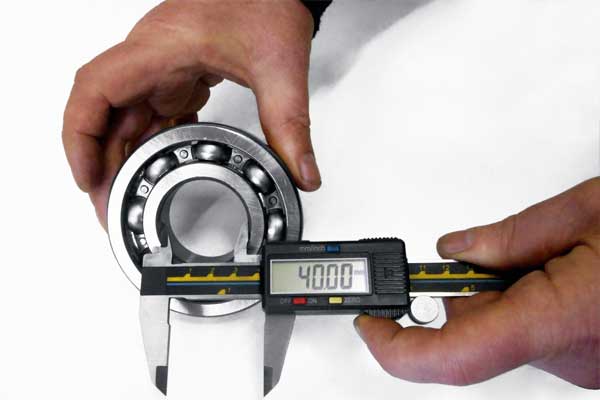
How to measure bearing outer diameter?
Measuring the outer diameter of a bearing is essential for determining its size and compatibility within a mechanical system. Proper measurement ensures that the bearing fits correctly and functions optimally. In this section, we will guide you through measuring the outer diameter of a bearing accurately.
Here’s a step-by-step guide to measuring the outer diameter of a bearing:
Clean the Bearing: Begin by cleaning the outer surface of the bearing to remove any dirt, debris, or lubricants that could interfere with the measurement. Use a lint-free cloth or a mild solvent to ensure a clean and clear surface.
Select a Measuring Tool: Choose an appropriate measuring tool based on your preference and the level of precision required. Dial calipers, micrometers, or outside diameter (OD) gauges are commonly used to measure bearings’ outer diameter.
Prepare the Measuring Tool:
- Set up the measuring tool according to the specific type you are using.
- For dial calipers, ensure the jaws are clean and aligned properly. If using a micrometer, adjust it to the appropriate range by turning the thimble and locknut.
- If using an OD gauge, make sure it is correctly calibrated.
Position the Bearing: Hold the bearing securely and place it on a flat surface, ensuring it is stable and doesn’t move during the measurement.
Take the Measurement:
- Insert the measuring tool’s jaws or anvils around the outer surface of the bearing.
- Ensure the tool is perpendicular to the bearing’s axis for accurate measurements.
- Gently close the jaws or anvils until they make contact with the outer surface of the bearing.
Read and Record the Measurement: Look at the scale or digital display on your measuring tool and record the reading corresponding to the outer diameter of the bearing. Pay attention to the units of measurement (e.g., millimeters or inches) for accurate documentation.
Repeat for Accuracy: To ensure accuracy, take multiple measurements at different points along the outer diameter of the bearing. This helps account for minor irregularities or variations in the bearing’s outer dimensions. Take multiple readings and calculate the average to obtain a more precise measurement.
Check Tolerance: Compare the measured outer diameter with the bearing’s specifications or reference standards to ensure it falls within the acceptable tolerance range. Tolerance information can typically be found in bearing catalogs or manufacturer specifications.
By following these steps, you can accurately measure the outer diameter of a bearing. Handle the bearing carefully and use the appropriate measuring tool for reliable and precise results. Taking accurate measurements is crucial for selecting the right bearing size and ensuring optimal performance and longevity in your mechanical systems.
How to measure bearing width accurately?
Measuring the width of a bearing accurately is essential to ensure proper fit and functionality within a mechanical system. The width measurement is crucial for selecting the right bearing size and ensuring optimal performance. In this section, we will guide you through measuring the width of a bearing accurately.
Here’s a step-by-step guide to measuring the width of a bearing:
- Clean the Bearing: Clean the bearing’s width surface to remove any debris, dirt, or lubricants that may interfere with the measurement. Use a lint-free cloth or a mild solvent to ensure a clean and clear surface.
- Select a Measuring Tool: Choose an appropriate measuring tool based on your preference and the level of precision required. Dial calipers or micrometers are commonly used for measuring the width of bearings.
- Prepare the Measuring Tool: Set up the measuring tool according to the specific type you are using. For dial calipers, ensure the jaws are clean and aligned properly. If using a micrometer, adjust it to the appropriate range by turning the thimble and locknut.
- Position the Bearing: Hold the bearing securely and place it on a flat surface, ensuring it is stable and doesn’t move during the measurement.
- Take the Measurement: Use the measuring tool to measure the width of the bearing. Position the jaws of the caliper or the anvil and spindle of the micrometer against the opposing width surfaces of the bearing. Ensure the measuring tool is aligned perpendicular to the axis of the bearing for accurate results. Close the jaws or anvil/spindle until they contact the bearing surfaces.
- Read and Record the Measurement: Look at the scale or digital display on your measuring tool and record the reading corresponding to the width of the bearing. Pay attention to the units of measurement (e.g., millimeters or inches) for accurate documentation.
- Repeat for Accuracy: To ensure accuracy, take multiple measurements at different points along the width of the bearing. This helps account for minor irregularities or variations in the bearing’s width dimensions. Take multiple readings and calculate the average to obtain a more precise measurement.
- Check Tolerance: Compare the measured width with the bearing’s specifications or reference standards to ensure it falls within the acceptable tolerance range. Tolerance information can typically be found in bearing catalogs or manufacturer specifications.
By following these steps, you can accurately measure the width of a bearing. Handle the bearing carefully and use the appropriate measuring tool for reliable and precise results. Taking accurate width measurements is crucial for selecting the right bearing size and ensuring optimal performance and longevity in your mechanical systems.
Determining bearing bore diameter
Determining the bore diameter of a bearing is a critical step in measuring its size and compatibility within a mechanical system. The bore diameter refers to the innermost diameter of the bearing, which corresponds to the shaft size it will fit onto. Accurate measurement of the bore diameter ensures the proper selection and installation of the bearing. Here’s a step-by-step guide to help you determine the bore diameter of a bearing:
- Clean the Bearing: Begin by cleaning the bore surface of the bearing to remove any dirt, debris, or lubricants that may affect the measurement. Use a lint-free cloth or a mild solvent to ensure a clean and clear surface.
- Choose a Measuring Tool: Select an appropriate measuring tool based on your preference and the level of precision required. Common options include inside micrometers, telescoping gauges, or dial bore gauges.
- Prepare the Measuring Tool: Set up the measuring tool according to the specific type you are using. Adjust it to the appropriate range for inside micrometers by turning the thimble and locknut. For telescoping gauges or dial bore gauges, ensure they are clean and calibrated.
- Position the Bearing: Hold the bearing securely and place it on a flat surface, ensuring it remains stable during measurement.
- Insert the Measuring Tool: Insert the measuring tool into the bore of the bearing. Ensure the tool is aligned perpendicular to the axis of the bearing for accurate results. Expand or extend the measuring tool until it touches the bore surface gently.
- Take the Measurement: Read the measurement indicated on the scale or digital display of the measuring tool. If using an inside micrometer, check the measurement on the thimble and note the value where it aligns with the reference line on the sleeve. If using a telescoping gauge or dial bore gauge, read the measurement directly from the gauge or the dial indicator.
- Repeat for Accuracy: To ensure accuracy, take multiple measurements at different points along the bore diameter. This helps account for any minor irregularities or variations in the bore size. Take multiple readings and calculate the average to obtain a more precise measurement.
- Check Tolerance: Compare the measured bore diameter with the bearing’s specifications or reference standards to ensure it falls within the acceptable tolerance range. Tolerance information can usually be found in bearing catalogs or manufacturer specifications.
By following these steps, you can accurately determine the bore diameter of a bearing. Handle the bearing carefully and use the appropriate measuring tool for reliable and precise results. Accurate bore diameter measurements are crucial for selecting the right bearing size and ensuring proper fit and performance within your mechanical system.
Understanding bearing tolerance classes for measurement
Bearing tolerance classes play a crucial role in determining the acceptable dimensional variations and accuracy of bearings. These classes establish the permissible limits within which the bearing dimensions can deviate from the ideal specified values. Understanding bearing tolerance classes is essential when measuring bearings as it helps assess whether the measured dimensions fall within the acceptable range. Here’s an overview of bearing tolerance classes and their significance:
- ISO Tolerance Classes: The International Organization for Standardization (ISO) has established a standardized system for bearing tolerances known as ISO 492. It defines several tolerance classes, denoted by the letters P, N, M, and K, followed by a number (e.g., P0, P6, N2). The classes indicate increasing levels of precision and decreasing tolerances.
- ABEC Tolerance Classes: The Annular Bearing Engineering Committee (ABEC) is an American standard that specifies bearing tolerances for precision bearings. ABEC classes range from 1 to 9, with higher numbers indicating tighter tolerances and higher precision. ABEC classes are commonly used for ball bearings in North America.
- Importance of Tolerance Classes: Bearing tolerance classes provide a standardized framework for assessing bearings’ dimensional accuracy and precision. They ensure consistency in manufacturing, interchangeability of bearings, and compatibility within mechanical systems. Tolerance classes help engineers and users select bearings that meet their application requirements.
- Bearing Tolerance Zones: Tolerance classes define different tolerance zones within which bearing dimensions are allowed to vary. These zones include the upper and lower limits that determine the acceptable range of dimensions. Bearings manufactured to tighter tolerance classes have narrower tolerance zones, indicating higher precision and stricter control over dimensional variations.
- Impact on Bearing Measurements: It is essential to compare the measured dimensions against the applicable tolerance class when measuring bearings. If the measurements fall within the specified tolerance zone for a given class, the bearing is considered within tolerance. If the measurements exceed the tolerance limits, it may indicate a bearing outside the acceptable range or potential issues with dimensional accuracy.
- Application-specific Considerations: The choice of bearing tolerance class depends on the specific application requirements. Precision machinery or high-speed applications typically demand bearings with tighter tolerances (e.g., higher ISO or ABEC classes). On the other hand, applications with less critical dimensional requirements may utilize bearings with looser tolerances.
When measuring bearings, understanding the applicable tolerance class allows you to determine whether the measured dimensions meet the desired level of precision and accuracy. Consult manufacturer specifications or relevant standards to identify the appropriate tolerance class for your specific application. By considering tolerance classes, you can ensure proper fit, functionality, and performance of the bearings within your mechanical system.
Tools for measuring bearing size
Several tools are commonly used for measuring bearing size accurately. The choice of tool depends on the specific dimension being measured and the level of precision required. Here are some of the commonly used tools for measuring bearing size:
- Vernier Calipers: Vernier calipers are versatile tools that measure various bearing dimensions, including inner diameter, outer diameter, and width. They consist of main and sliding vernier scales, allowing for precise measurements. Vernier calipers are available in both analog and digital forms, offering different levels of accuracy.
- Micrometers: Micrometers are precision measuring instruments suitable for measuring bearings’ outer diameter, inner diameter, and width. Inside micrometers can accurately measure bore diameter, while outside micrometers can measure the outer diameter. Micrometers are highly accurate and commonly used in industries requiring precise measurements.
- Dial Calipers: Dial calipers are similar to vernier calipers but feature a dial gauge for measurement readings. They provide a quick and reliable way to measure bearing dimensions such as outer diameter, inner diameter, and width. Dial calipers are available in analog and digital versions, with digital calipers offering easier reading and higher accuracy.
- Bore Gauges: Bore gauges, also known as inside diameter (ID) gauges or telescoping gauges, are specifically designed for measuring the inner diameter or bore of a bearing. They consist of two or three telescoping arms that can be adjusted to fit inside the bore and provide an accurate measurement. Bore gauges are commonly used when measuring the bore diameter of cylindrical or tapered roller bearings.
- Depth Gauges: Depth gauges are useful for measuring the depth of features in a bearing, such as the depth of a groove or raceway. They consist of a rod or blade with a measuring scale, allowing for precise depth measurements. Depth gauges are available in various types, including digital and dial depth gauges.
- Optical Comparators: Optical comparators, also known as profile projectors, use a magnified optical image of the bearing to measure dimensions. These devices project the image onto a screen, allowing for accurate measurements of various features, such as diameters and widths. Optical comparators are commonly used in quality control and inspection processes.
- Coordinate Measuring Machines (CMMs): CMMs are advanced metrology tools used for precise and automated bearing dimension measurements. They use touch probes or optical sensors to gather data and generate 3D models of the bearing, enabling accurate measurement of complex geometries and tolerances.
When selecting a tool for measuring bearing size, consider the dimensions you need to measure, the accuracy required, and the bearing you are working with. Handling the bearing with care during measurement is important to avoid any damage or inaccuracies.
How to measure roller bearing dimensions?
Measuring roller bearing dimensions accurately is crucial for selecting the correct size and ensuring optimal performance in mechanical systems. Roller bearings have unique dimensions that need to be measured carefully. Here’s a step-by-step guide on how to measure roller-bearing dimensions:
- Clean the Bearing: Clean the roller bearing to remove any dirt, debris, or lubricants that could affect the measurement accuracy. Use a lint-free cloth or a mild solvent to ensure a clean and clear surface.
- Measure Outer Diameter (OD): Place the bearing on a flat surface to measure the outer diameter of a roller bearing. Use calipers, micrometers, or an outside diameter (OD) gauge to measure the distance across the outer surface of the bearing. Ensure the measuring tool is aligned perpendicular to the axis of the bearing for accurate results. Take multiple measurements at different points along the outer diameter to account for variations and calculate the average.
- Measure Inner Diameter (ID): To measure the inner diameter of a roller bearing, you can use various methods depending on the type of bearing:
- For cylindrical roller bearings: Use inside micrometers or bore gauges to measure the inner diameter. Adjust the micrometer or gauge to fit inside the bearing bore and take the measurement.
- For tapered roller bearings: Use a tapered bore gauge or tapered micrometer. These tools allow you to measure the tapered inner diameter accurately. Adjust the gauge or micrometer to fit the tapered bore and take the measurement.
- Measure Width (W): Measure the width of the roller bearing using calipers, micrometers, or a depth gauge. Place the bearing on a flat surface and align the measuring tool to measure the distance between the two opposing surfaces of the bearing. Take multiple measurements at different points along the width and calculate the average for greater accuracy.
- Check Tolerance: Once you have obtained the measurements for the outer diameter, inner diameter, and width, compare them with the bearing’s specifications or reference standards. Check the tolerance class or manufacturer specifications to ensure the measured dimensions fall within the acceptable range.
- Record the Measurements: Record the measured dimensions, including the outer diameter, inner diameter, and width, in the appropriate units (e.g., millimeters or inches). Keep these measurements for future reference and for selecting the correct replacement bearings if needed.
When measuring roller bearing dimensions, handling the bearing carefully, using the appropriate measuring tools, and taking multiple measurements for accuracy is important. Additionally, consult the bearing manufacturer’s guidelines or specifications to ensure proper measurement techniques for specific types of roller bearings.
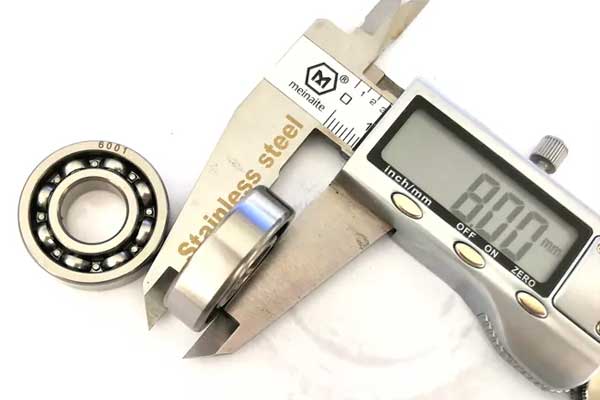
How to measure ball bearing size?
Measuring the size of a ball bearing accurately is essential for selecting the right replacement or compatible bearing for a specific application. Here’s a step-by-step guide on how to measure the size of a ball bearing:
- Determine the Type of Ball Bearing: Identify the type of ball bearing you are measuring, such as deep groove ball bearings, angular contact ball bearings, or thrust ball bearings. The measurement methods may vary slightly depending on the bearing type.
- Measure the Outer Diameter (OD): Use calipers, micrometers, or an outside diameter (OD) gauge to measure the outer diameter of the ball bearing. Place the bearing on a flat surface and align the measuring tool to measure the distance across the outer surface of the bearing. Ensure the measuring tool is aligned perpendicular to the axis of the bearing for accurate results. Take multiple measurements at different points along the outer diameter to account for variations and calculate the average.
- Measure the Inner Diameter (ID): To measure the inner diameter of a ball bearing, you can use various methods depending on the bearing type:
- For deep groove ball bearings: Use inside micrometers or bore gauges to measure the inner diameter. Adjust the micrometer or gauge to fit inside the bearing bore and take the measurement.
- For angular contact ball bearings: Measure the inner diameter using calipers or micrometers directly on the inner ring of the bearing. Ensure the measuring tool contacts the inner ring surfaces for an accurate measurement.
- Measure the Width (W): Measure the width of the ball bearing using calipers, micrometers, or a depth gauge. Place the bearing on a flat surface and align the measuring tool to measure the distance between the two opposing surfaces of the bearing. Take multiple measurements at different points along the width and calculate the average for greater accuracy.
- Check Tolerance: Compare the measured dimensions of the outer diameter, inner diameter, and width with the bearing’s specifications or reference standards. Check the tolerance class or manufacturer specifications to ensure the measured dimensions fall within the acceptable range.
- Record the Measurements: Record the measured dimensions of the ball bearing, including the outer diameter, inner diameter, and width, in the appropriate units (e.g., millimeters or inches). Keep these measurements for future reference and for selecting the correct replacement bearings if needed.
Remember to handle the ball bearing carefully during measurement to avoid any damage or inaccuracies. Additionally, consult the bearing manufacturer’s guidelines or specifications for specific instructions on measuring ball bearing sizes, as different bearing types may have slight variations in measurement techniques.
Conclusion
In conclusion, accurately measuring the bearing size is crucial for selecting the right bearing and ensuring optimal performance in mechanical systems. Whether measuring the dimensions of roller or ball bearings, following a systematic approach is key. Using appropriate tools such as calipers, micrometers, bore gauges, and depth gauges, one can obtain precise measurements of key parameters such as outer diameter, inner diameter, and width. Additionally, checking the tolerance classes and comparing the measured dimensions with manufacturer specifications ensures that the bearing falls within the acceptable range. Taking multiple measurements and calculating the average further enhances accuracy. By understanding and implementing proper measurement techniques, individuals can confidently choose the correct bearing size, facilitating smooth operation and longevity of the mechanical system.